 |
|
 06-21-2012, 02:23 AM
|
#1
|
|
Lt. Commander
Join Date: May 2012
Location: NH
Posts: 123
|
 rub rail remove and re-install?
I've read several posts here that say to remove the rubber bumper for the rub rail, just heat it a bit, and then pry it out gently. Re-install seems to be a simple tap-tap-tap affair with a mallet.
Ok, this seems easy enough, but I have some questions and concerns.
Looking at the rub rail on my 1990 SCR-2700, it appears the rubber bumper is one piece that surrouds the boat. The seam is at the center of my swim platform, then it goes entirely around the boat. There appears to be a screw at each end.
So am I correct that it's a one piece rubber bumper? How hard is it to remove the entire rubber bumper in one piece without breaking it?
Do you think this can be removed, and re-installled while the boat is in the water at a slip? I'm sure it's work!
I need to remove this so I can replace the side panels that cover the interior between the headliner and the carpet on the sides as mine are a mess after water damage over the years.
Thanks for any advice!
__________________
__________________
My 1990 Maxum was sold today. I had it less than one year, but it was good to me!
Rich
|

|

|
|
06-21-2012, 02:54 AM
|
#2
|
|
Lieutenant
Join Date: Jun 2012
Location: Bronx, NY (Long Island Sound)
Posts: 97
|
Hey Rich,
I've dealt with those rubber bumpers on my previous boat. ussually they are 1 piece all the way around, 2 pieces at most. heating them up definitely helps but yea if you want to remove the whole thing and reinstall it, its definitely a lot of work. that black rubber isn't cheap either, i think it goes for like $3 a foot. so to be more understanding of your need, is it the screws beneath the rubber that you need to get to? its the kind of job that i would wait until the end of the season when the boat is out of the water to do personally, but i'm sure its possible to do in a slip. definitely a time consuming job though, those rubber rails are a pain to deal with. my previous boat doesn't even have the rubber anymore because once i took it off, it didn't wana go back in since it was old and weathered. (previous boat is a 17' 1968 Glastron Bowrider)
-Joe
__________________
|
|
|
|
|
06-21-2012, 03:17 AM
|
#3
|
|
Lt. Commander
Join Date: May 2012
Location: NH
Posts: 123
|
Yes, I need to get access to the scews under the rubber of the rub rails.
I was also considering removing it to do the work I want to do now, and replacing it sometime in the future, perhaps when the boat is out of the water.
__________________
My 1990 Maxum was sold today. I had it less than one year, but it was good to me!
Rich
|
|
|
|
|
06-21-2012, 04:52 AM
|
#4
|
|
Lt. Commander
Join Date: May 2010
Location: Last Mountain Lake, Saskatchewan
Posts: 101
|
I will be doing mine soon as I need to silicone the clamshell seam underneath that is leaking. I expect you will be doing that also. Are your side panels that rosy pink color?
Any photos and a follow up report would be great.
|
|
|
|
|
06-21-2012, 10:58 AM
|
#5
|
|
Lt. Commander
Join Date: May 2012
Location: NH
Posts: 123
|
My side panels are a sort of maroon color, but most are water stained and deteriorated.
__________________
My 1990 Maxum was sold today. I had it less than one year, but it was good to me!
Rich
|
|
|
|
|
06-21-2012, 01:58 PM
|
#6
|
|
Admiral
Join Date: Jul 2009
Location: Fairfax Va
Posts: 1,512
|
Not that I've had the rub rail off of my boat, but are you certain removing the screws under it will release the side panels?
I thought the screws under the RR only joined the upper and lower halves of the boat. It's likely that the panels were installed before the two halves were joined.
|
|
|
|
|
06-21-2012, 02:08 PM
|
#7
|
|
Captain
Join Date: Nov 2010
Location: Massapequa, New York, United States
Posts: 762
|
post some pictures!
|
|
|
|
|
06-21-2012, 03:23 PM
|
#8
|
|
Lt. Commander
Join Date: May 2012
Location: NH
Posts: 123
|
Quote:
Originally Posted by ss3964spd

Not that I've had the rub rail off of my boat, but are you certain removing the screws under it will release the side panels?
I thought the screws under the RR only joined the upper and lower halves of the boat. It's likely that the panels were installed before the two halves were joined.
|
Knowing that I was going to have to replace them anyway, I pulled the corner of one of the side panels free to look behind it. Guess what I saw? The business end of a nice stainless steel screw (that I had just pulled free from the rear of the side panel), it's head was right between two of the washers and nuts that held the rub rail on, coming from the exterior of the boat. I was dumbfounded to learn that the factory had attached interior 'upholstery' from the outside of the boat! I think a few choice words leaked out of my lips when I found this!
If I can, I'll try to get some pictures the next time I'm on the boat.
__________________
My 1990 Maxum was sold today. I had it less than one year, but it was good to me!
Rich
|
|
|
|
|
06-21-2012, 04:03 PM
|
#9
|
|
Admiral
Join Date: Nov 2005
Location: Everett Wa
Posts: 4,681
|

ok...let me chime in here....yes the rubber rub rail is USUALLY one piece....the interior trim panels are held in place by screws thru the rub rail frame....you have someone hold it in place while the person on the outside screws the screw into it .......it's a pain unless you have that person holding it flush and tight against the interior.....
the best way to remove the rub rail is if your in the water...take the whole thing out...remember where the start is...mark if need be...then heat and gently pull the rub rail out of the track.....keep heating as you pull it.....once it's all the way out....and you do the interior work your wanting to do...just back the screws out far enough to release the interior panel......don't remove the screws....when replacing the interior panels...have the person align the panels properly and press on the panel to ensure it's close enough for the screws to grip the back of the panel....the person on the outside needs to run the screws in being careful not to strip the panel....after all the panels are in place...run a bead of 4200 silicon sealant over the screws and in the middle of the track to ensure that no leaks occur to the interior....(trust me on this one).....
now insert the end of the rubber insert at the stern or where the start was marked....insert the holding screw.....start heating the rubber and press into the track.....using a rubber mallet to seat the insert ..work your way around the boat slowly making sure the rubber insert seats well.....remember if your too short...something wasn't heated...if your too long ...let it sit for a bit to cool off and hopefully it will shrink up a little enough to fit in the track at the end....
insert screw to hold finished end in place.....
now run a bead of 4200 silicone sealant over the top AND the bottom of the track to ensure water doesn't work it's way into the interior ........
now your done.....it's not hard...just time consuming........
SP
__________________
Don't compare your life to others. You have no idea what their journey is all about. 
------------------------
SSN683 Association member 
Par Excellence
------------------------------
2008 Bayliner 340 - "Wild Whim"
--------------------------------------
I live in my own little world....but it's okay-they know me here!!! 
Avid practitioner of the martial art: KLIK-PAO. 
Tap-Rack-Bang
Anyone that sez "Size doesn't matter" has never owned a boat!
|
|
|
|
|
06-21-2012, 05:31 PM
|
#10
|
|
Lt. Commander
Join Date: May 2012
Location: NH
Posts: 123
|
Just as I imagined! LOL
Thanks for the recap!
Why the hell did the factory think it was ok to secure interior panels from outside the boat? 
__________________
My 1990 Maxum was sold today. I had it less than one year, but it was good to me!
Rich
|
|
|
|
|
06-21-2012, 05:47 PM
|
#11
|
|
Admiral
Join Date: Nov 2005
Location: Everett Wa
Posts: 4,681
|
how else ya gonna hang those things..
SP
__________________
Don't compare your life to others. You have no idea what their journey is all about.
------------------------
SSN683 Association member
Par Excellence
------------------------------
2008 Bayliner 340 - "Wild Whim"
--------------------------------------
I live in my own little world....but it's okay-they know me here!!!
Avid practitioner of the martial art: KLIK-PAO.
Tap-Rack-Bang
Anyone that sez "Size doesn't matter" has never owned a boat!
|
|
|
|
|
06-21-2012, 08:46 PM
|
#12
|
|
Lt. Commander
Join Date: May 2012
Location: NH
Posts: 123
|
They could have embeded some more wood inside the fiberglass there, to give something to screw into from the inside.
Hmm.. that gives me an idea, perhaps I'll glue (5200?? or epoxy) some wood strips in the area, and then I can scew the panels in from the inside. So I won't have to ever mess with the rub rail again!
I'm thinking of working on this in stages, and I may want to replace my headliner, as well as the bulkhead and sidewall coverings. Unfortunately this strip needs to be removed first, and replaced last.
So I either remove the rub rail, and this strip, and leave it off for a period of time while I work on the inside of the boat, while trying to enjoy it a bit. Or I come up with some alternate plan, or do this next spring before the boat is in the water.
The problem is that on my boat, this maroon strip that runs around the interior looks like hell! It's water and mold stained, and is torn/worn in some places. Just removing it may be an improvement! If it wasn't covered in foam and then fabric, it wouldn't have held so much water, and therefore ended up so moldy and stained looking.
I was thinking I may consider replacing this with some teak, or other wood finish, rather than cover it in fabric again. Of course this would add more weight than the foam based fabric, unless I used some sort of vaneer. Another idea (not that i like too much, but it's an idea) is to use some sort of removable translucent panel to replace the maroon strip in this area, and then use some led lighting (rope lighting?) behind it to provide light for the salon? Sort of like the light that runs over the salon overhead that is in between the overhead supports. But I'm not sure how this would look, and instead of being over head, it's at about eye level, so it may not be pleasant in practice.
I'm looking for ideas, not only on how to mechanically perform the operation(s) (remove/replace these side panels), but also on how to make it look better after I'm done.
__________________
My 1990 Maxum was sold today. I had it less than one year, but it was good to me!
Rich
|
|
|
|
|
06-21-2012, 10:50 PM
|
#13
|
|
Lt. Commander
Join Date: May 2010
Location: Last Mountain Lake, Saskatchewan
Posts: 101
|
So SP, I thought I read on another thread that in addition to the screw holes there is a seam where the two halves come together that often leaks. Is that correct?
|
|
|
|
|
06-21-2012, 11:14 PM
|
#14
|
|
Admiral
Join Date: Nov 2005
Location: Everett Wa
Posts: 4,681
|
yes...the top half and the hull half is screwed and riveted under the rub rail...that's how they join them together.....sealing the rivets and screws prevents water intrusion into the interior...
SP
__________________
Don't compare your life to others. You have no idea what their journey is all about.
------------------------
SSN683 Association member
Par Excellence
------------------------------
2008 Bayliner 340 - "Wild Whim"
--------------------------------------
I live in my own little world....but it's okay-they know me here!!!
Avid practitioner of the martial art: KLIK-PAO.
Tap-Rack-Bang
Anyone that sez "Size doesn't matter" has never owned a boat!
|
|
|
|
|
06-29-2012, 03:03 PM
|
#15
|
|
Lt. Commander
Join Date: May 2012
Location: NH
Posts: 123
|
Here are some pictures...
First is the interior trim... looks pink, but at one time I believe this was Maxum marroon:
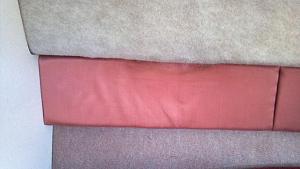
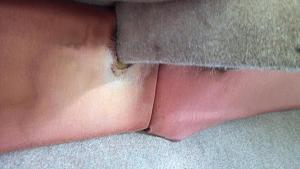
I want to replace this interior trim, not only because it's faded and ugly, but because this boat had of a lot of water damage:
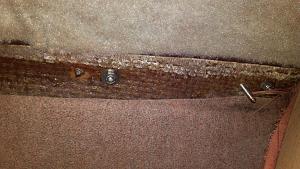
Here's what the boat seam looks like under this trim where you can see three things:
1) A 'pop' rivet (it doesn't look very happy)
2) Two different positions showing a SS washer and nut that holds the seam together
3) A long SS screw that is used to hold this trim panel on from the outside.
As an alternate to removing the rubber rub rail insert at this time, one idea I had was to remove these panels from the inside (just rip them out of the holding screws, it's not too hard), use a cut-off wheel and cut off the long screws that were holding the trim panels, and then attach some velcro (using epoxy?) to this seam which will then be used to hold a replacement trim panel of some sort.
What do you think? Any and all ideas or comments would be appreciated!
__________________
My 1990 Maxum was sold today. I had it less than one year, but it was good to me!
Rich
|
|
|
|
|
06-29-2012, 07:57 PM
|
#16
|
|
Lt. Commander
Join Date: May 2010
Location: Last Mountain Lake, Saskatchewan
Posts: 101
|
My trim is the exact color. I think it was always that color (hey it was 1990). I have water damage in the same area from rain. I am not sure velcro will work in a bouncing boat. You may need to glue it. I have some pics of what I want mine to look like like I will post soon.
|
|
|
|
|
07-11-2012, 03:08 PM
|
#17
|
|
Lt. Commander
Join Date: May 2012
Location: NH
Posts: 123
|
Here is the picture of what is behind those trim panels held on by the screws through the rub rail frame:

I'm still considering cutting off these long screws with a cut-off rotary saw (or dremel tool) and then apply some 'industrial' strength Velcro here, then use the Velcro to hold on the trim panels. This makes the trim panels removable (if needed) without messing with the rub rail again.
Then, when I do get around to taking the rubber out of the rub rail, I can seal it, and not have to worry about the trim panels.
The industrial strength Velcro has a pretty strong grip. I can use the self adhesive type, or just epoxy the Velcro to the fiberglass here.
__________________
My 1990 Maxum was sold today. I had it less than one year, but it was good to me!
Rich
|
|
|
|
|
07-11-2012, 03:23 PM
|
#18
|
|
Moderator
Join Date: Apr 2008
Posts: 5,603
|
You're going to need to 'gob' the screw that you cut with some 4200 or 5200 to keep water from coming in. I did do what you described on one of my panels, and it did work, but I would not consider it a permanent solution. In reality, the rub rail should come off, then the wood screws removed, then the holes properly sealed, then the rub rail re-installed, and the panels hung internally.
|
|
|
|
|
07-11-2012, 09:13 PM
|
#19
|
|
Lt. Commander
Join Date: May 2012
Location: NH
Posts: 123
|
Shrew,
I know I'll have to re-address the screws from the outside, but I'm hoping to get the interior workable before I remove the rubber insert to the rub rail.
When you say "the rub rail should come off", I assume you mean to only remove the rubber bumper, not the entire rub-rail frame. Please correct me if I'm wrong. 
On the panels where you used the Velcro to re-install the panels, how did it work over time?
__________________
My 1990 Maxum was sold today. I had it less than one year, but it was good to me!
Rich
|
|
|
|
|
07-12-2012, 02:18 PM
|
#20
|
|
Lieutenant
Join Date: Sep 2011
Location: Nashua, NH
Posts: 64
|
I didn't read the post too carefuly - but I've done some work with the rub rail and it was a complete pain in the @$$.
First - I believe the rub rail (at least on my boat) is held in place with rivets, not screws. If so, these would need to be drilled out or something. Like yours, it was one piece - and had the seam in the center.
My rub rail was banged up, and bent (from hitting the dock) in a few places. I tried head, hammer, everything - couldn't get it to straighten out. I eventuall jacked the boat up, but the rub-rail to bend it, and did some pretty aggressive clamping to bend it the other way.
Sort answer: very difficult, and had to be done out of the water! I took some pictures of it, they are a this thread post:
http://www.maxumownersclub.com/forum...8816#post18816
|
|
|
|
|
|
| Thread Tools |
Search this Thread |
|
|
|
| Display Modes |
 Linear Mode Linear Mode
|
 Posting Rules
|
You may not post new threads
You may not post replies
You may not post attachments
You may not edit your posts
HTML code is Off
|
|
|
|
 » Recent Threads
 |
|
|
|
|
|
|
|
|
|
|
|
|
|
|
|
|
|
|
|
|
|


