Go Back   Maxum Boat Owners Club - Forum > Maxum General > Projects and Customisations
Click Here to Login
Register FAQ Community Calendar Today's Posts Log in

Reply
 
Thread Tools Search this Thread Display Modes
 
Old 05-10-2010, 03:56 PM   #1
Admiral

 
ss3964spd's Avatar
 
Join Date: Jul 2009
Location: Fairfax Va
Posts: 1,512
Send a message via Yahoo to ss3964spd
Default Installing Trim Tabs

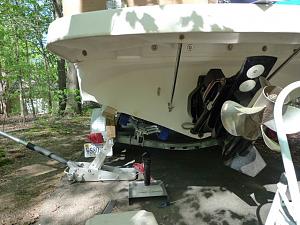
As if the battery project was not enough fun (and hours) I also decided to install trim tabs, mostly to correct a starboard list, but also to help ease the ride when running in choppy conditions.

I shopped hard for trim tabs. It drives me nuts when manufacturers do not provide enough technical information to explain exactly how their product works on their web sites - one must often resort to down loading their operating manuals to really learn how something works. For instance, Bennett sells their "ATC" (once set the system adjusts itself depending on conditions) but their web site fails to mention that one must still install rocker switches. Dumb - I think, they should have built it all into a single controller).

I weighed the advantages of Bennetts (hydraulic), Lenco and Minn Kota (electric but similar to Bennett), and Volvo's QL tabs (electric but operate somewhat differently than typical "tabs".

All their web sites suggested my little boat needed enormous tabs - 24" span (width) X 9" cord (long). No way - there isn't a single boat in the same size range as mine that had tabs that big on it, and mine simply doesn't have enough transom to mount such large tabs, not to mention running afoul of the trailer tie down straps.

In the end I went with Bennett hydraulic tabs - mostly because of their customer service prior to even buying them. They spent a couple of hours total on the phone with me explaining things and making suggestions, and even stepped up to the plate in after wards when I realized I'd made a blunder (more on blunder later).

What I ended up with is 12X12 tabs, and Bennett's EIC (fancy, LED lit rocker switches - because I like the pretty lights and they give a visual representation of tab position) with auto tab retractor (the "standard kit" comes with tabs, the hyd pump, and simple rocker switches). The ATR rasies the tabs anytime the ignition is switched off.

Sure is hard to drill holes in a boat, especially below the water line. The 12X12 tabs need to be installed with a slight upwards pitch of 5/8 of an inch from level relative to the hull bottom. The floor jack and 2X4 provide the means to hold the tab in place and to place something between the tab and the 2X4 to achive the 5/8" upwards pitch - for which I used one of the hyd fittings from the kit. Place the backing plates in position, mark the holes, drill, apply liberal amounts of 4200 sealant, around - and into each hole, sealant on the screw threads, and run them in, clean off excess sealant.
Click image for larger version

Name:	Trim 1.JPG
Views:	43
Size:	97.3 KB
ID:	615Click image for larger version

Name:	Trim 3.JPG
Views:	36
Size:	67.4 KB
ID:	616Click image for larger version

Name:	Trim 4.JPG
Views:	31
Size:	76.5 KB
ID:	617

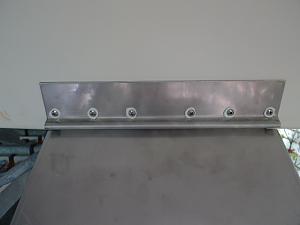
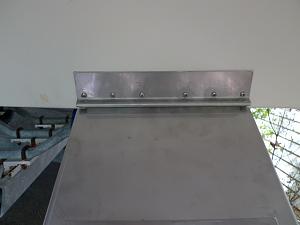
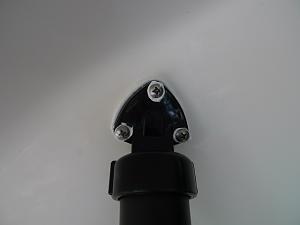
Next, with the tabs mounted and supported by the 2X4 - with the necessary 5/8" upwards pitch, attach tab end of the hyd ram to the tab, locate the top of the ram on the transom and draw an outline of it. Remove and tape on the supplied hole location template. 5 holes are required here; one large-ish hole for the hyd fitting, one smaller for the position sensor lead, and 3 for the mount. Attach the 3" brass nipple for the hyd line into the back of the upper mount, slather 4200 on everything, and carefully guide the nipple through it's hole, hold everything in place and get one of the mounting screws started. 3 hands would have been useful.
Click image for larger version

Name:	Trim 5.JPG
Views:	34
Size:	60.1 KB
ID:	618[ATTACH][/ATTACH]
__________________

ss3964spd is offline   Reply With Quote
Old 05-10-2010, 04:24 PM   #2
Admiral

 
ss3964spd's Avatar
 
Join Date: Jul 2009
Location: Fairfax Va
Posts: 1,512
Send a message via Yahoo to ss3964spd
Default

With the tabs mounted I then had to find a suitable location for the hydraulic pump, one that would provide ease of mounting (hopefully), accessibility, and in such a place that the control module (for retractor and position) could be located in close proximity to the pump as the wires from the pump to the module ain't all that long. It ended up on the starboard side on the bulk head just forward of the engine.
Click image for larger version

Name:	Trim 11.JPG
Views:	29
Size:	105.3 KB
ID:	620

The pump housing slides into a little bracket that, at first looks really flimsy for the job, but once installed - held to the bulk head by 4 screws, really holds onto the pump with a death grip. Bennett suggests keeping both hyd lines as close to equal length as possible so they operate in unison. The way I ran the line from the port ram left me with about 6" extra but the one from the starboard ram had way more. I simply looped the stb line a few times to comsume some of the extra, screwed on some tie wrap mounts, then secured the lines with tie wraps - like so:
Click image for larger version

Name:	Trim 12.JPG
Views:	22
Size:	101.6 KB
ID:	621
Attaching the other end of the hyd lines to the rams at the transom is quite a feat on this boat -unless you posess long, monkey like, arms. I do not. I had to go through the small access hatches on either side of the engine compartment (one of which is shown in my battery thread I think). It would have been useful to dislocate at least one shoulder before attempting entry. Those of larger frame than I will not fit. I got stuck. Twice.
Power for the pump is directly from the recently installed "house" battery. At some point I may re-wire it but - havng just completed the battery project earlier I had had enough with wiring. Besides, the tabs are deemed non-essential.
__________________

ss3964spd is offline   Reply With Quote
Old 05-10-2010, 04:36 PM   #3
Admiral

 
ss3964spd's Avatar
 
Join Date: Jul 2009
Location: Fairfax Va
Posts: 1,512
Send a message via Yahoo to ss3964spd
Default

Last, but not least, is the EIC control (previously mentioned fancy rockers with blinky lights) at the helm - involving drilling yet another hole in my boat and, to keep the excitement going, more wiring. The EIC has a long umbilical cable from it to the control module mounted in the egine compartment, and also needs to be connected to an ignition switched 12V source AND something that senses when the engine is actually running - like the tachometer. Running the umbilical didn't involve too many body contortions but trying to do 12v and tach connections was miserable. You see, access to the back of the helm, where the fuse panel and all other wiring lives, is via a very small access panel. Maxum could have made that panel much larger but someone obviously saw the humor in making it small - knowing someone, some day, would have to work in there. Bastards.

EIC template at the helm, and EIC mounted.

Click image for larger version

Name:	Trim 7.JPG
Views:	26
Size:	95.9 KB
ID:	624Click image for larger version

Name:	Trim 8.JPG
Views:	28
Size:	104.7 KB
ID:	623Click image for larger version

Name:	Trim 9.JPG
Views:	33
Size:	98.8 KB
ID:	622

Dan
ss3964spd is offline   Reply With Quote
Old 05-10-2010, 05:46 PM   #4
Admiral

 
ss3964spd's Avatar
 
Join Date: Jul 2009
Location: Fairfax Va
Posts: 1,512
Send a message via Yahoo to ss3964spd
Default

Oh, forgot to mention The Blunder.

In one conversation with Bennett, during which I told them I had no room for the ginormous tabs they said I needed, I asked about their "drop fin" tabs. For a given size a DF tab provides more lift than a standard tab because it traps water between the drop fins. Here's what they look like:
Click image for larger version

Name:	Trim 6.JPG
Views:	47
Size:	91.6 KB
ID:	619

The only caveat is that water must flow in a straght line under the hull and through the tab - which Bennett warned me of. No worries, I thought, the transom is 90* to the strakes. Turns out, it isn't.

No, as it turns out the bottom edge of the transom actually tapers towards the front of the boat. In other words, using the photo above, the outter most point on the port chine is actually farther rearward than is the lowest point of the transom below the garboard drain plug. Of course, I didn't realize this until I had BOTH tabs and rams already mounted and I stood back to admire my handywork. It was only then that I saw that the tabs angled in (if you were to draw a straight line through the center of each tab, extending rearward, at some point those lines would connect somewhere behind the boat).

Not
going
according
to
plan.

These DF tabs are going to create an enormous amount of drag as the water actually hits the sides of the drop fins and changes direction. I need the regular tabs.

You cannot order directly from Bennett, and my order - through one of their many retailers, was deemed a special order because of the drop fin tabs and therefore non-returnable. That's just super.

I called Bennett and pleaded my case. What they agreed to do was to exchange the 12X12 DF tabs for 12X12 flat tabs. They also agreed to ship the flats directly to me and said that as long as they received the DF back within 2 weeks they'd not charge me a dime. I had the new tabs 2 days later, swapped them, and send the DF's back in 3 days.
Click image for larger version

Name:	Trim 14.JPG
Views:	29
Size:	105.3 KB
ID:	625

Gotta love customer service like that.

Dan
ss3964spd is offline   Reply With Quote
Old 05-11-2010, 07:38 PM   #5
Admiral

 
seapuppy's Avatar
 
Join Date: Nov 2005
Location: Everett Wa
Posts: 4,681
Default

great report out....I have found bennett to be top notch in the customer service dept....I've called and spoken to the tech team a few times...when I ordered my bennett auto trim tabs setup...the original pig tails were so short I had to extend them to make em long enough to hook it up in the dash to the computer....I told em and on the next boat..I did the same thing..ordered the bennett trim tabs and they came with the extended pig tails....great stuff....

SP
__________________
Don't compare your life to others. You have no idea what their journey is all about.
------------------------
SSN683 Association member
Par Excellence
------------------------------
2008 Bayliner 340 - "Wild Whim"
--------------------------------------
I live in my own little world....but it's okay-they know me here!!!

Avid practitioner of the martial art: KLIK-PAO.
Tap-Rack-Bang

Anyone that sez "Size doesn't matter" has never owned a boat!
seapuppy is offline   Reply With Quote
Old 05-12-2010, 01:40 PM   #6
Admiral

 
ss3964spd's Avatar
 
Join Date: Jul 2009
Location: Fairfax Va
Posts: 1,512
Send a message via Yahoo to ss3964spd
Default

Thanks Steve, was actually a fun project to do - except having to reach waaaaaay back to the transom to connect the hyd lines to the nipples. Was wishing for freakishly long arms at that point.

Have to agree with you regarding Bennett. It was refreshing, for a change, to deal with a company that obviously understands the importance of first rate customer service. At my age I've had my fill of knuckle draggers.

Dan
ss3964spd is offline   Reply With Quote
Old 05-12-2010, 02:07 PM   #7
member
 
Join Date: Aug 2009
Posts: 327
Thumbs up Now you are going to be a level headed boater!

N-I-C-E work and report Dan, it belongs on an episode of SHIPSHAPE! Very thorough indeed. Tabs are a great feature for both comfort and safety. Do the tabs have Anodes on the top of them? Just a thought. increasing the amount of noble metal (in this case two big plates of stainless steel) can increase the problem of galvanic corrosion combined with the notorious already known for corrosion of the Bravo III's aluminum gear casings. I read that they are more prone to corrosion because of the extra hunk of SS contained in the 2nd screw. Makes sense. This spring I completely stripped and repainted both my BIII's with the Dupont Ful-thane urethane aircraft paint system, what a job that was. They came out tits though after two weeks worth of nites crouched under that transom. Anyway good job! Now you’re fine champagne wont spill listing sideways going down the river!

Bella Sera
Bella Sera 3300SCR is offline   Reply With Quote
Old 05-12-2010, 03:15 PM   #8
Admiral

 
ss3964spd's Avatar
 
Join Date: Jul 2009
Location: Fairfax Va
Posts: 1,512
Send a message via Yahoo to ss3964spd
Default

Thanks Bella.

No, the tabs did not come with anodes but I did order (and install) some on the tabs at the same time I ordered the BIII anode kit from BoatZincs. Although I ran the boat all last season in brackish water without the prop nut anode - and still had no corrosion, I will install the prop nut anode this year.

I've been lucky with my BIII so far - not a single trace of corrosion on the thing and the only place that is missing the factory powder coating is on the skeg.

I hear ya - crouching under the swim platform gets old pretty fast!

Dan
__________________

ss3964spd is offline   Reply With Quote
Reply


Posting Rules
You may not post new threads
You may not post replies
You may not post attachments
You may not edit your posts

BB code is On
Smilies are On
[IMG] code is On
HTML code is Off
Trackbacks are Off
Pingbacks are Off
Refbacks are Off


Powered by vBadvanced CMPS v3.2.3

All times are GMT. The time now is 01:17 PM.


Powered by vBulletin® Version 3.8.8 Beta 4
Copyright ©2000 - 2024, vBulletin Solutions, Inc.